Pages

Showing posts with label Chicken. Show all posts

Wednesday, 21 April 2021

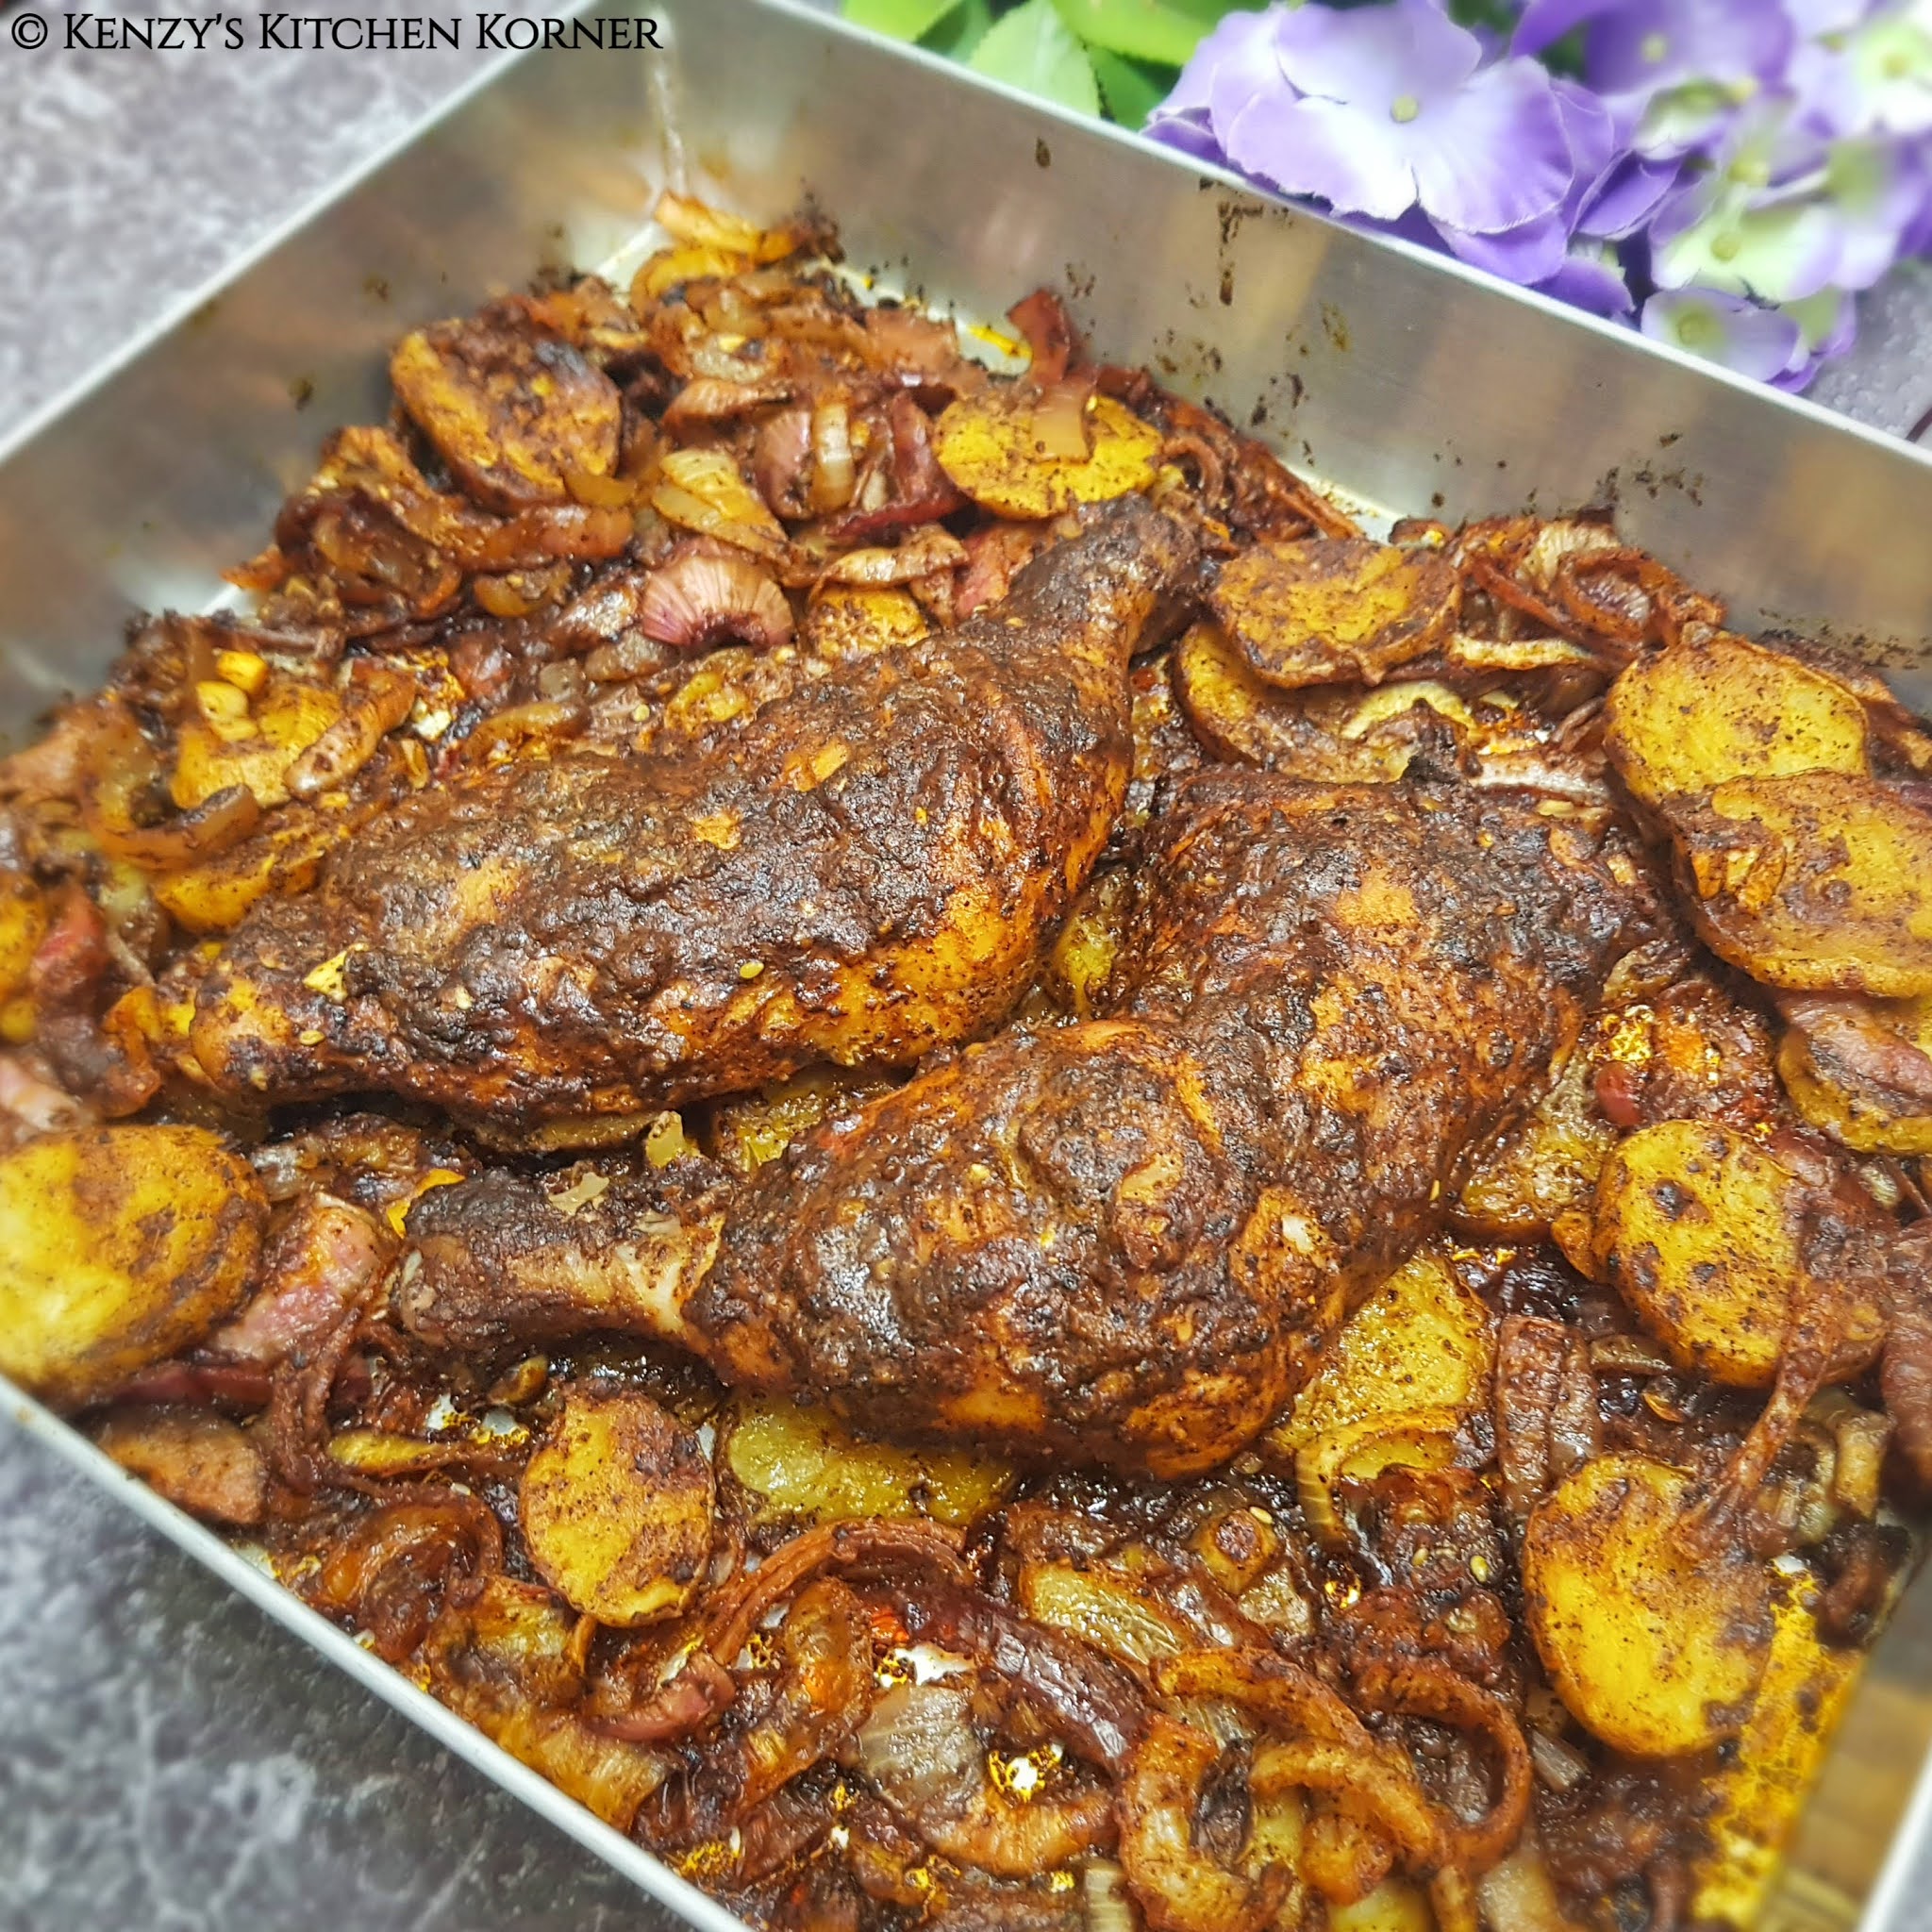
Sumac - Zatar Roast Chicken (Done Two Ways)


This recipe is the perfect example of ‘Ugly-Delicious’.

I’d been itching to make this ever since a friend (Priyanka) had cooked this for a potluck, one that I’d been unable to attend. I troubled Priyanka with so many questions as I hate for a recipe to go wrong. Quite a many people say, people who cook by ‘andaz’ (without ingredient proportions), by instinct, are better cooks, I’m certainly not the type to cook ‘by andaz’. Give me perfect recipes and I will surely re-try them in my kitchen. I guess it’s Andaz Apna Apna!

The marinade gives the roast a dark muddy look, but, oh those flavours… they pop ever so gorgeously on the palate. I promise you, this one’s a keeper, guys!

I did not change much in the recipe shared by Pri. The one thing my Bawi genes forced me to incorporate, though, were potato roundels. This recipe is courtesy Priyanka Anand, the girl who ever so kindly, and patiently, answers my most ridiculous recipe queries. *sheepish grin* Priyanka, thank you, ESM! *evil grin, you know why*

Ingredients:

2 whole chicken legs
1 large onion, cut into thick semi-circles
2 large potatoes, scrub, retain skin and cut into half centimetre roundels
3 tablespoons olive oil
5 medium-sized garlic, finely minced (I used a garlic press)
½ - ¾ teaspoon turmeric powder
1 – 1½ teaspoon Kashmiri chili powder (I used MDH Deghi Mirch powder)
2 teaspoons Zatar
3 teaspoons Arabic All-Spice
3 teaspoons Sumac
Salt to taste
Butter to baste while roasting

Method for Marination:
  1. Cut deep gashes on the chicken legs.


  2. Mix olive oil, minced garlic, turmeric powder, chili powder, Zatar, Arabian All-Spice, Sumac and salt.


  3. Apply the marinade to the chicken legs, onions and potato roundels and keep aside, in the fridge, for at least an hour. (The chicken can be kept in the fridge for hours, or even overnight)
Method of Oven Roast:
  1. Preheat the oven for 10-15 minutes at 180 degrees C.
  2. Lay out the potato roundels at the bottom of the baking pan and set the marinated chicken on top of the potatoes. Spread the remaining potatoes and the onions around the chicken, in the baking pan. The extra marinade can be spooned onto the chicken if you prefer a spicier roast.


  3. Slide the baking pan into the oven and bake at 180 degrees C for 45 minutes.
  4. At the 45-minute mark, baste the chicken with butter, increase the oven setting to 200 degrees C and roast for 7 to 8 minutes more.
  5. Bring out the chicken and allow to rest for a few minutes. Serve with gorgeously roasted potatoes and onions. (Scrape off the potatoes stuck to the bottom of the tray; those are the best bits - I served a lightly crisped Buttered-Zatar-sprinkled Garlic Bread with the roast chicken. You may, or may not, serve it with a bread of your choice)

    Ugly-Delicious, indeed!

Method for Air-Fryer:

  1. Make a make-shift squarish pan with a double-layered aluminium foil to fit the air-fryer basket. The make-shift pan should be slightly smaller than the size of the air-fryer basket. All four ‘edge’ sides of the air-fryer basket need to be open so as to allow proper airflow.
  2. Preheat the air-fryer for 3-4 minutes at the 200-degree setting.


  3. Put the marinated chicken legs (underside facing up) in the make-shift pan and lower the pan into the air-fryer basket.
  4. Air-fry for 12 minutes at 200 degrees.
  5. At the 12-minute mark, flip both the chicken legs and continue air-frying for another 10 minutes.


  6. At the 10-minute mark, baste the chicken legs with a wee bit of butter (optional, but of course, I did) and continue air-frying for 2 more minutes.
  7. Remove the chicken from the air-fryer and serve it with onion rings and a wedge of lime. (I was a tad lazy hence no onion rings, I merely made do with a wedge of lime)


Chef Notes:
  1. The Arabic spices mentioned in the recipe are all available on Amazon (some on Big Basket, too). Go buy them coz they will not go to waste. Why?? Coz once you make this roast; you’re going to want to make it time and again. This is my promise to you!!
  2. The bake time will depend entirely on your oven – so please keep an eye on the roast and adjust the timing accordingly. I say this, as the bake time in my oven differed greatly from the bake time mentioned by Priyanka in her recipe.
  3. At the time of this bake, I had run out of olive oil hence opted for the extra virgin version and it worked just as beautifully, so don’t let that stop you from baking these babies.
  4. You may share the direct blog link of the recipe/s but do NOT publish my recipes and my photographs on any blog site or website without my explicit consent or attempt to pass off my recipe/s as your own. You will be held accountable for plagiarism.
Some more photographs:




Thursday, 21 January 2021

Béchamel Chicken Bake


There was a time when I had no clue what a chicken baked dish meant. My masi introduced me to the wonderful world of béchamel/white sauce. She was a pro at making European/Continental food. It was under her tutelage that I learnt to make perfect béchamel/white sauce. I take this opportunity to say, ‘thank you’. She gave me her love, her time and taught me to cook this… and so many other dishes. I would never have learnt to cook, or experienced such food, at that age, had it not been for her. From the bottom of my heart,
‘THANK YOU, Jeroo masi!’ 

Over the years, I have added my twists to Masi’s classic/traditional bake, and this is my take on it; a take I have perfected over the years. I hope the recipe works just as beautifully for you as it has for me over the years.

Ingredients: 

1¼ cup / 150 grams all-purpose flour (Maida)
150 - 175 grams butter
½ tablespoon butter (for mushrooms)
600 grams chicken legs (For me, 2 whole legs and 2 drumsticks equalled 600 grams)
200 mils chicken stock (room temperature)
650 mils milk (room temperature)
200 grams mushrooms, cut into quarters
200 grams tin golden-corn niblets
4 -5 green chilies, finely chopped
½ - ¾ tablespoon Mrs Dash (optional - a seasoning for baked dishes)
150 grams + 150 grams cheese
Salt to taste
Coarsely ground pepper, to taste
   

Method: 
  1. In a large vessel (or a pressure cooker), add the chicken, 600-700 mils water, salt, and pepper.
  2. Cook (or pressure cook) until done.
  3. Drain the chicken from the stock. Reserve 200 mils stock. (Add a squeeze of lime, and sip on the extra stock while you cook 😉)


  4. Shred the boiled chicken (discard bones). Keep aside. 


  5. Grate the cheese. Keep aside. 


  6. Heat ½ tablespoon butter in a skillet, sauté mushrooms for 2 minutes, on HIGH heat, tossing them constantly. Remove from the skillet and keep aside. 


  7. In a large thick-bottomed pan heat butter. 
  8. Add all-purpose flour and stir constantly until you smell a nice toasty aroma. (We want the flour to roast well and lose its rawness but, at the same time we do NOT want it turning colour) 


  9. Lower heat and gradually add the chicken stock, all the while stirring continuously to ensure the sauce does not turn lumpy. 
  10. Gradually add the milk (one cup at a time); keep stirring on LOW flame till you get a smooth, thick white sauce. The sauce should thickly coat the back of a spoon. 


  11. Add 150 grams cheese and stir until it becomes one with the white sauce. 


  12. Add the green chillies, Mrs Dash seasoning (optional). 


  13. Add salt and pepper, to taste, as needed. (Check for seasoning, as cheese is salty and the chicken stock, too, contained salt) 


  14. Add the mushroom, corn niblets and shredded chicken. Stir to mix well. 


  15. Remove the white sauce contents into a large 9-inch Pyrex, or Borosil, baking dish. 


  16. Top with remaining 150 grams of grated cheese. 


  17. Bake for 40-45 minutes at 200 degrees C until the top to gets to a warm golden brown colour. Remove and serve hot!


 Chef Notes:

  1. This quantity usually suffices for a family of 4 or 5 people. If you are cooking for 2, I suggest you halve the quantity. With regard to quantity, do not go by the photographs posted; I had tripled the quantity as I was cooking for a potluck party.
  2. Usually, béchamel is made with milk but to give the bake added flavour, somewhere along the years, I began adding a wee bit of stock to it. You may go the traditional route if you so prefer - omit the stock and add the same quantity of milk, instead. 
  3. As the roasted flour is hot, the milk and stock must be at room temperature. To a large extent, that will prevent the formation of lumps when you stir the liquids into the roux. 
  4. IMPORTANT: Unless you are extremely well versed with the cooking of the white sauce, always ensure you add the stock/milk and stir the white sauce on LOW flame. This, too, ensures the sauce does not turn lumpy. 
  5. Please feel free to adjust the number of green chillies to suit your tolerance of spice. The same goes for cheese. If you prefer a cheesier bake, feel free to add more (or less) cheese. 
  6. Variation to Point No: 16 - Instead of sprinkling grated cheese on top of the bake, I sometimes use Cheeseling gravel (crushed cheeseling biscuits). Give it a try, it works beautifully. 
  7. If you do not have the 'Mrs Dash' seasoning, just go with salt, pepper, and green chillies. Trust me, that’ll work just as well. You may substitute Mrs Dash with a few shakes of bottled mixed dried herbs. 
  8. Please don’t panic if your white sauce has a few lumps. Take the vessel off the stove, use a motorized hand blender, and give the white sauce a whiz to smoothen it. Voila! Smooth sauce 😉 Put it back on the LOW flame and stir continuously until the sauce thickens to the desired consistency. 
  9. Depending on the oven, sometimes, the base of the bake-dish will cook and begin to bubble while the cheese on top fails to brown. In the event of this happening, feel free to turn on the grill/broiler mode of the oven for a few minutes to brown the top of the bake-dish.
  10. You may share the direct blog-link of the recipe/s but do NOT publish my recipes and my photographs on any blog-site or website without my explicit consent or attempt to pass off my recipe/s as your own. You will be held accountable for plagiarism.
Some more photographs:


Sunday, 18 October 2020

Kheema Masoor Pulao


I saw this recipe at a Ranveer Brar video, on Facebook. I instantly fell in love with it. I knew right away I had to recreate it. While Ranveer chose to make this with chicken kheema (mince), the hardcore carnivore in me opted for mutton mince. I doubled the quantity so if you are cooking for a family of three or four, I suggest you halve the ingredients. 

As I’d chosen mutton mince, I adjusted the proportion of a few ingredients. I also added an extra twist to this fabulous recipe to enhance it further. Read on to know what I did. 😉

Ingredients:

½ cup sabut masoor (Brown Lentil), wash and soak for 2 hours
2½ cups Basmati rice, wash, and soak for 20 to 30 minutes
500 grams mutton mince
140 grams fried onions
230 grams onions, chopped or sliced
4 green chilies, cut into 1-inch slant pieces
3 heaped tablespoons ginger garlic paste
2 large pinches of saffron (optional but I’d say, go with it)
7 tablespoons/105 grams bland curd (NOT sour), (Important: whisk to a smooth texture)
3 heaped teaspoons Deghi Mirch Powder
½ teaspoon turmeric powder
2½ teaspoons coriander powder
A handful coriander leaves, chopped
A large handful mint leaves, chopped
5 - 6 tablespoons clarified butter (ideally, 6 😉)
2 Bay leaves
4 pieces of 1-inch cinnamon
6 - 8 cloves
12 -16 black peppercorns
1 teaspoon cumin seeds
Salt to taste (for kheema marination and rice)


Method:
  1. Add fried onions (retain a bit for garnish), raw onions, green chilies, ginger-garlic paste, saffron, curd, Deghi mirch powder, turmeric powder, coriander powder, coriander leaves, mint leaves, and salt to the mutton mince. Marinate well and leave aside for 30 minutes.


  2. Heat ghee in a thick bottomed vessel or a large non-stick pan. (I used a huge heavy bottomed non-stick pan) 


  3. Add bay leaves, cinnamon, cloves, black peppercorns, and cumin seeds. Allow to splutter. 


  4. Add the marinated mutton mince and sauté until the clumpy kheema gets to a nice crumbly mince texture. The mince may leave a bit of water at this point: don't worry about it.


  5. Drain the sabut masoor and add to the mutton mince. 


  6. Sauté the mutton mince and sabut masoor for 2 to 3 minutes minutes. 


  7. Drain the rice and add it to the mutton mince-masoor mix. 
  8. Add 1350 mils of water, salt to taste, and give it one (only one, please) very gentle stir. 


  9. Once the water begins to bubble, turn the flame to low, cover the vessel with a tight lid and continue cooking for 20 to 25 minutes. (Do NOT keep opening the vessel frequently to check) 
  10. After 20-25 minutes on low heat, the water will have been absorbed by the pulao. Open the lid, QUICKLY pick up a few random grains of rice and QUICKLY shut the lid again. 


  11. Check the grains of rice for doneness. If the rice still has a light bite to it continue cooking for 2-3 more minutes on LOW heat, then shut off the stove and keep the vessel covered for 10 minutes and allow the cooked rice to ‘rest’. 
  12. Open the lid and gently, with a spatula, toss the rice to separate the grains. Go into the rice from the sides of the vessel and toss the rice in the middle. (Video attached to show how.)


This is where Ranveer Brar’s recipe ends. The next step is all me and I urge you to put in a wee bit of effort to take this recipe to greater heights. The recipe by Brar is so perfect, it deserves the honour of a ‘Dhungar’. 😊

Dhungar (Smoking):

Ingredients:

Small aluminium or stainless vati (small bowl)
OR
Double a sheet of aluminium foil and make a small makeshift bowl 
A tiny piece of coal
1 teaspoon pure ghee/clarified butter

Method: 
  1. Once you open the lid and gently toss the rice, put a small stainless steel vati in the centre or the rice. If the pulao is filled right to the top of the vessel, create a crater in the centre of the rice and then place the vati in that crater.


  2. Heat a tiny piece of coal on the stove and when it gets to a point wherein it begins to glow red.


  3. Carefully place it in the vati. 


  4. Quickly, but carefully, pour the pure ghee/clarified butter over the coal. 


  5. Immediately shut the lid over the pulao vessel. 
  6. Leave covered for 10 to 15 minutes. Open the lid after 10-15 minutes and remove the vati/charcoal.
  7. Garnish with the pulao with the remaining fried onions. Inhale that fabulous smoky aroma and… Serve! 


Chef Notes:
  1. Do NOT use sour dahi and please ensure you whisk the dahi to a smooth texture before adding it to the mince.
  2. I’d doubled the quantity of ingredients for this recipe hence used quite a generous pinch of saffron. If you chose to use a tiny pinch, or no saffron at all, the colour of your rice will not have that light ‘saffron-yellow’ hue. Saffron is optional but I’d say, go with it. After all it’s a pulao. 😉 
  3. For clarification with regard to the water added to the rice, the ratio is 1:2 therefore add 5 cups water (1250 mils) for 2.5 cups rice, and approximately 125/150 mils (10% extra) for the masoor. 
  4. When you add salt to the rice, please err on the side of caution as salt was also added to the kheema/mince. 
  5. Once you shut the lid, for the rice to cook, remember to turn the flame to LOW and let the water and the heat do its thang (thing 😊). Hold yourself back from wanting to open the lid time and time again and refrain from stirring the rice. If you follow this point as directed, rest assured, the grains of rice will not be a broken mess. 
  6. The 10 minute ‘resting time’, after the rice is cooked, is extremely essential. It gives the rice time to hold its shape, ensuring the grains don’t disintegrate when you toss them later, to separate the grains. It ensures you plate a gorgeous pulao. 
  7. Tip: Follow this ‘rest the rice’ rule whenever you cook rice. Pssssttt 😉 In case you have a wee bit of rice stuck to the bottom of the vessel, the ‘resting’ time (read: steam) will loosen up the stuck rice. Yeh meri guarantee hai! This, of course, does not apply when you burn the rice, warna bologe, “you had said it would loosen the rice”. 😝 
  8. While this pulao does not have huge pieces of meat or chicken adorning it and looks quite unassuming when you plate it, don’t go by its looks. Trust me, it is robust in flavour. Aur Dhunagar ke baad toh kya kehne! 
  9. While I know Ranveer Brar is too busy a person to reply, I would like to say… “Thank you ever so much for this fabulous recipe, Ranveer, and I hope, if you ever recreate it, you try giving it a Dhungar. It’ll take your fabulous recipe to new heights. From one food lover to another, I promise!” 
  10. As mentioned at the onset, the original recipe belongs Ranveer Brar. This version of the recipe and the photographs, though, belong to my blog, Kenzy’s Kitchen Korner. You may share the direct blog-link of the recipe/s but do NOT publish my recipes, and/or my photographs, on any blogsite or website without my explicit consent or attempt to pass off my recipe/s as your own. You will be held accountable for plagiarism.
Some more photographs: