Pages

Showing posts with label Starter - Appetizer. Show all posts

Wednesday, 21 April 2021

Sumac - Zatar Roast Chicken (Done Two Ways)


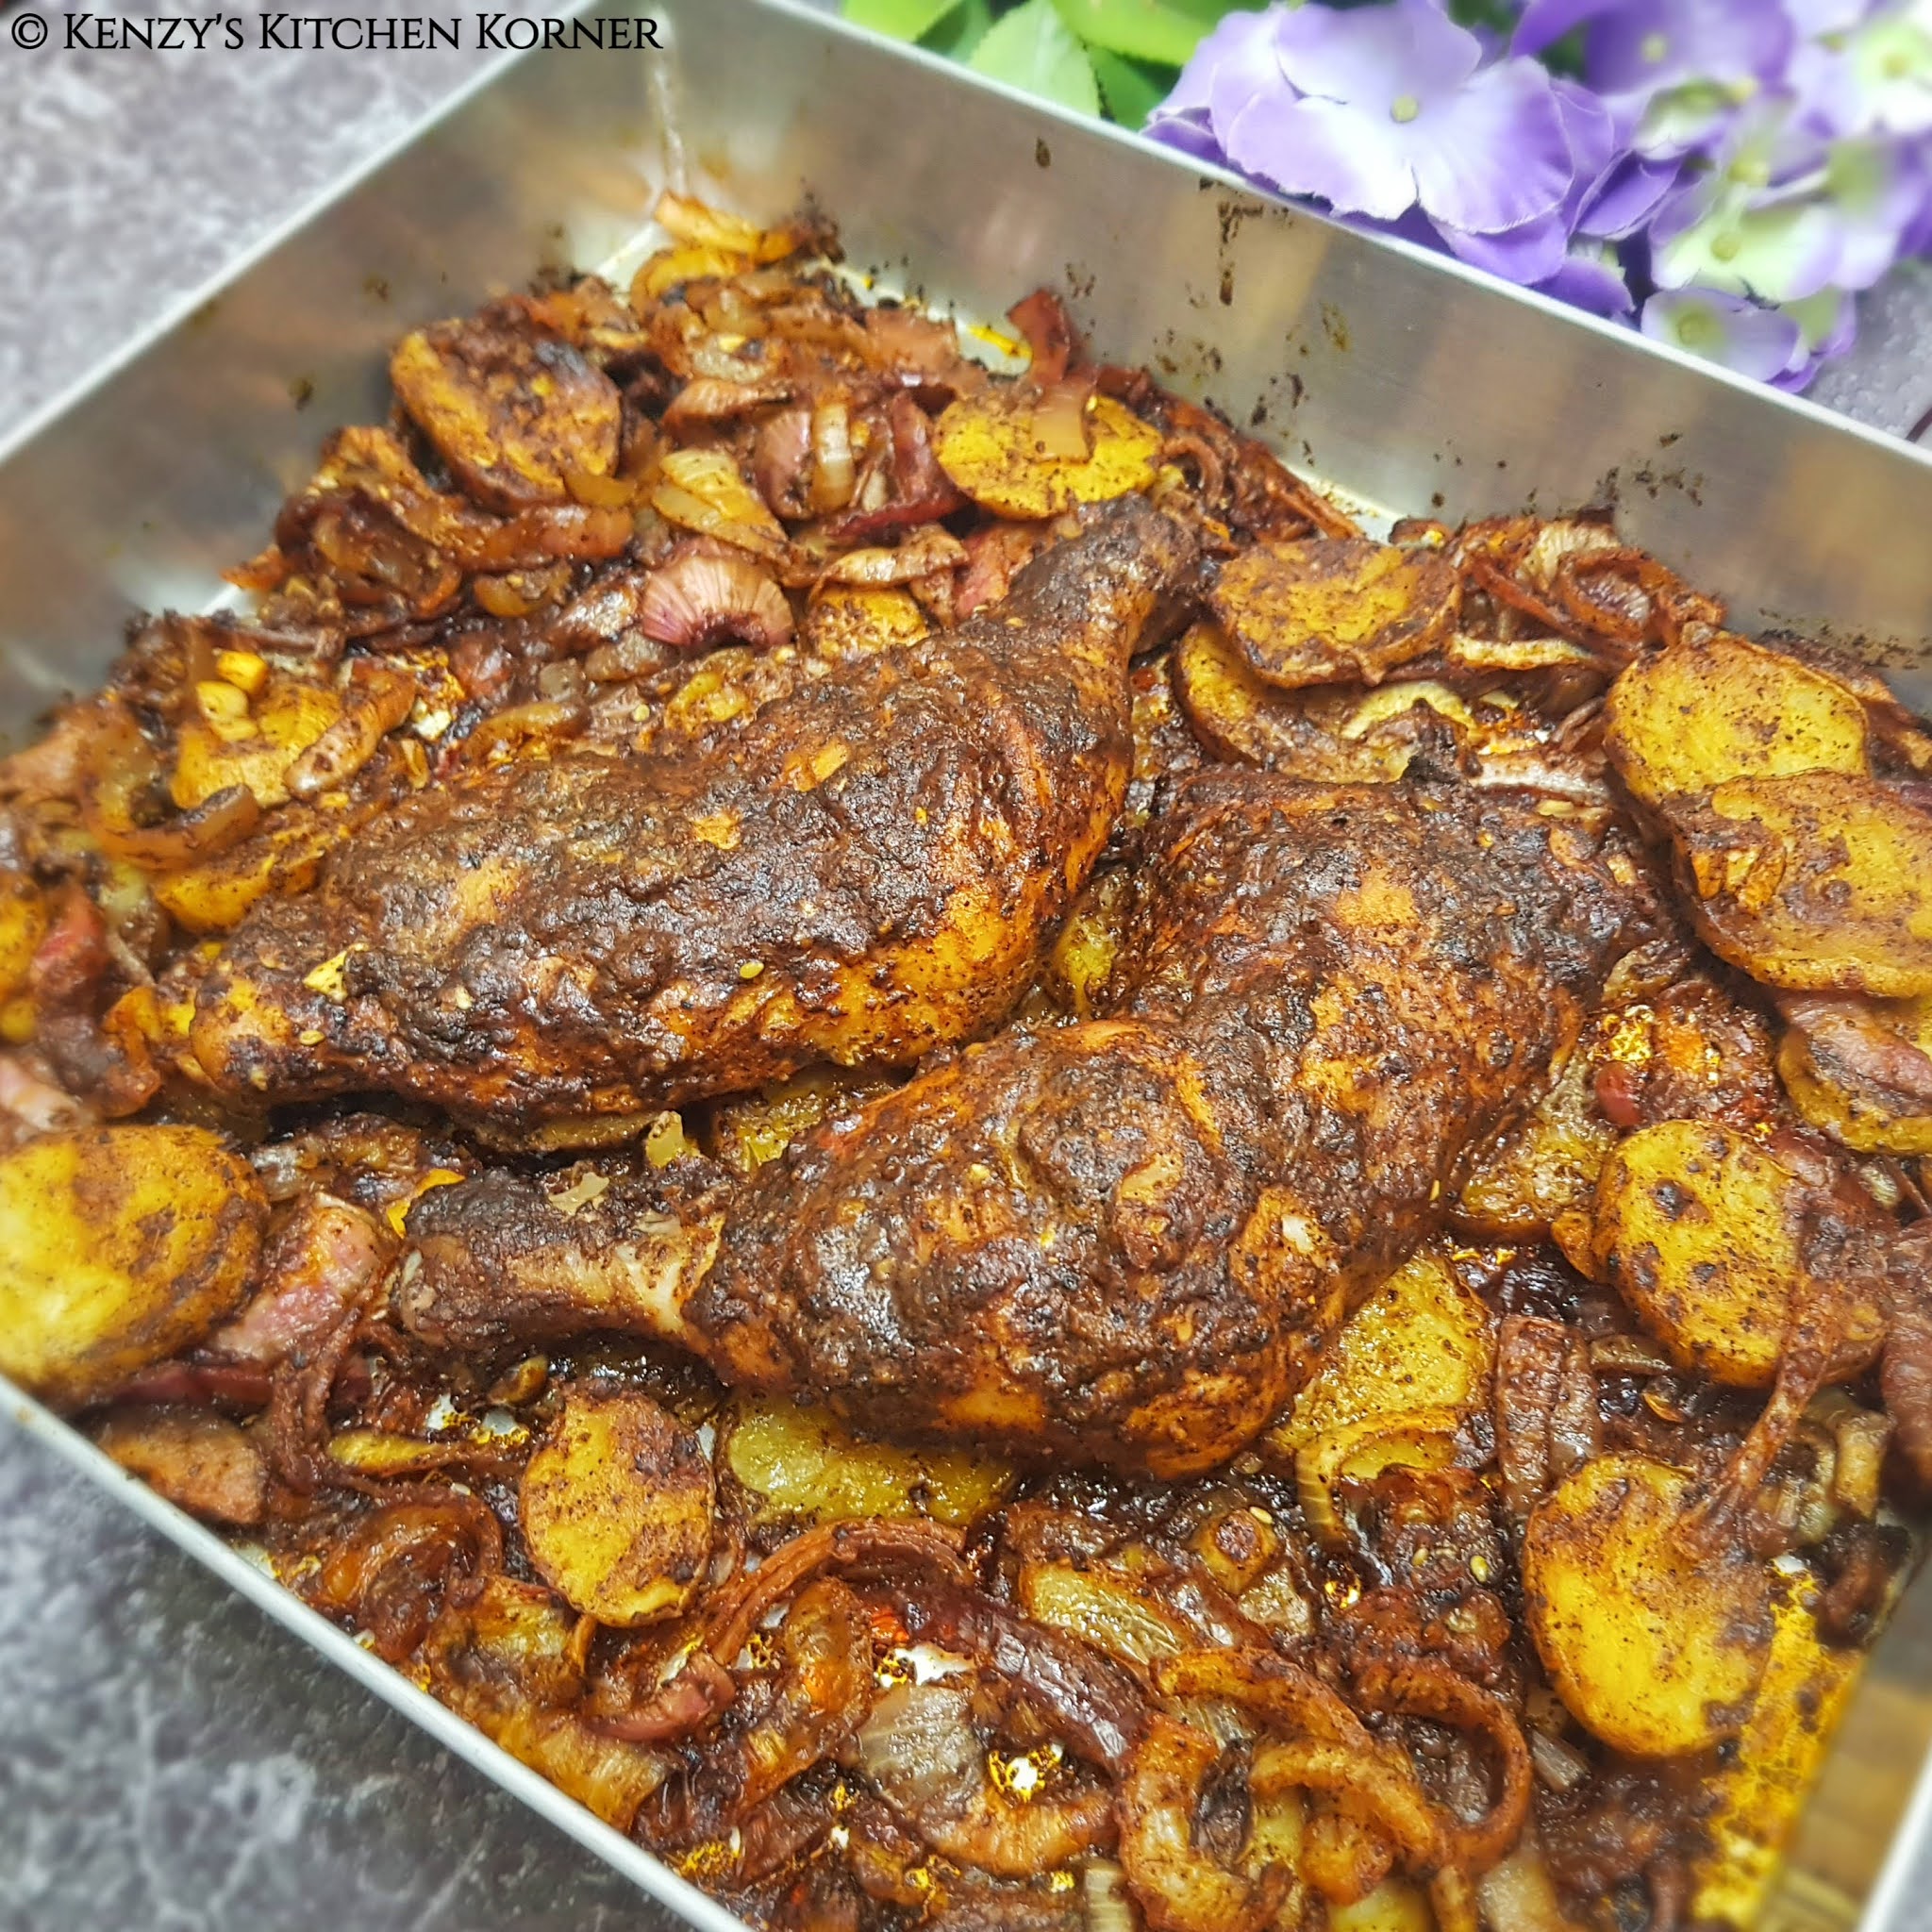
This recipe is the perfect example of ‘Ugly-Delicious’.

I’d been itching to make this ever since a friend (Priyanka) had cooked this for a potluck, one that I’d been unable to attend. I troubled Priyanka with so many questions as I hate for a recipe to go wrong. Quite a many people say, people who cook by ‘andaz’ (without ingredient proportions), by instinct, are better cooks, I’m certainly not the type to cook ‘by andaz’. Give me perfect recipes and I will surely re-try them in my kitchen. I guess it’s Andaz Apna Apna!

The marinade gives the roast a dark muddy look, but, oh those flavours… they pop ever so gorgeously on the palate. I promise you, this one’s a keeper, guys!

I did not change much in the recipe shared by Pri. The one thing my Bawi genes forced me to incorporate, though, were potato roundels. This recipe is courtesy Priyanka Anand, the girl who ever so kindly, and patiently, answers my most ridiculous recipe queries. *sheepish grin* Priyanka, thank you, ESM! *evil grin, you know why*

Ingredients:

2 whole chicken legs
1 large onion, cut into thick semi-circles
2 large potatoes, scrub, retain skin and cut into half centimetre roundels
3 tablespoons olive oil
5 medium-sized garlic, finely minced (I used a garlic press)
½ - ¾ teaspoon turmeric powder
1 – 1½ teaspoon Kashmiri chili powder (I used MDH Deghi Mirch powder)
2 teaspoons Zatar
3 teaspoons Arabic All-Spice
3 teaspoons Sumac
Salt to taste
Butter to baste while roasting

Method for Marination:
  1. Cut deep gashes on the chicken legs.


  2. Mix olive oil, minced garlic, turmeric powder, chili powder, Zatar, Arabian All-Spice, Sumac and salt.


  3. Apply the marinade to the chicken legs, onions and potato roundels and keep aside, in the fridge, for at least an hour. (The chicken can be kept in the fridge for hours, or even overnight)
Method of Oven Roast:
  1. Preheat the oven for 10-15 minutes at 180 degrees C.
  2. Lay out the potato roundels at the bottom of the baking pan and set the marinated chicken on top of the potatoes. Spread the remaining potatoes and the onions around the chicken, in the baking pan. The extra marinade can be spooned onto the chicken if you prefer a spicier roast.


  3. Slide the baking pan into the oven and bake at 180 degrees C for 45 minutes.
  4. At the 45-minute mark, baste the chicken with butter, increase the oven setting to 200 degrees C and roast for 7 to 8 minutes more.
  5. Bring out the chicken and allow to rest for a few minutes. Serve with gorgeously roasted potatoes and onions. (Scrape off the potatoes stuck to the bottom of the tray; those are the best bits - I served a lightly crisped Buttered-Zatar-sprinkled Garlic Bread with the roast chicken. You may, or may not, serve it with a bread of your choice)

    Ugly-Delicious, indeed!

Method for Air-Fryer:

  1. Make a make-shift squarish pan with a double-layered aluminium foil to fit the air-fryer basket. The make-shift pan should be slightly smaller than the size of the air-fryer basket. All four ‘edge’ sides of the air-fryer basket need to be open so as to allow proper airflow.
  2. Preheat the air-fryer for 3-4 minutes at the 200-degree setting.


  3. Put the marinated chicken legs (underside facing up) in the make-shift pan and lower the pan into the air-fryer basket.
  4. Air-fry for 12 minutes at 200 degrees.
  5. At the 12-minute mark, flip both the chicken legs and continue air-frying for another 10 minutes.


  6. At the 10-minute mark, baste the chicken legs with a wee bit of butter (optional, but of course, I did) and continue air-frying for 2 more minutes.
  7. Remove the chicken from the air-fryer and serve it with onion rings and a wedge of lime. (I was a tad lazy hence no onion rings, I merely made do with a wedge of lime)


Chef Notes:
  1. The Arabic spices mentioned in the recipe are all available on Amazon (some on Big Basket, too). Go buy them coz they will not go to waste. Why?? Coz once you make this roast; you’re going to want to make it time and again. This is my promise to you!!
  2. The bake time will depend entirely on your oven – so please keep an eye on the roast and adjust the timing accordingly. I say this, as the bake time in my oven differed greatly from the bake time mentioned by Priyanka in her recipe.
  3. At the time of this bake, I had run out of olive oil hence opted for the extra virgin version and it worked just as beautifully, so don’t let that stop you from baking these babies.
  4. You may share the direct blog link of the recipe/s but do NOT publish my recipes and my photographs on any blog site or website without my explicit consent or attempt to pass off my recipe/s as your own. You will be held accountable for plagiarism.
Some more photographs:


Tuesday, 22 December 2020

Coorg Pandi (Pork) Curry


I’d read this recipe many a times but was petrified to attempt it. Reason being, while I’ve cooked and eaten various meats, and offal, all my life, but when it comes to pork, I’d only eaten lots of it. I’d never cooked pork at home. Well, that was about to change coz when a friend mentioned he was visiting the local pork shop, I (bravely) told him to buy some for me. 😊 Once the oink reached me, there was no going back. Now, I had to cook it 😉 

Question: What recipe should I select for my first oink cook?
Fortunately, that decision was a no-brainer. I was extremely inspired by a very dear friend (Keroo) who had attempted a different Coorg Pandi recipe (via You Tube). Another reason being, I had sourced a bottle of Kachampuli Vinegar and was very eager to use it. 😊

This dish is nothing great to look at coz the Curry turns a dark, dark colour (nearly black) but flavour-wise, it’s a frikkin’ bomb! The kind that pleasantly explodes on your palate. 😊

Ingredients:


1½ kilo boneless pork chunks (with fat), wash and cut into 1½ inch cubes
2½ teaspoon turmeric powder
3 heaped teaspoons red chili powder (I used deghi mirch)
7 medium onions, peel and cut into large cubes
11 green chilies, break into 1-inch pieces (I used the long variety that’s not too spicy)
1½ pod garlic, peeled (weight AFTER peeling – 30 grams)
9 tablespoons Pandi Masala (recipe posted below)
1½ tablespoons Kachampuli Vinegar, or to taste
Salt to taste


Method: 

  1. Marinate the pork chunks in turmeric powder, chili powder and salt to taste. Give it a good mix. Keep aside for 30 minutes.


  2. Grind the onions, green chilies, and garlic into a smooth paste. Do NOT add any water to grind this as the onions will release quite a bit of its own. (In case you feel the need to add water, please add merely 1 tablespoon, no more) 


  3. Add the marinated pork to a pressure cooker, add 3 tablespoons water (please do NOT add more) and pressure cook for 6 whistles. (IMPORTANT: Immediately lower the flame after the first whistle, and continue cooking on low flame for the next 5 whistles) 


  4. Shut the stove after 6 whistles. Allow the pressure to release by itself and when the cooker has cooled down, open and remove the cooked pork into a large (non-reactive) vessel. (I used a large non-stick pan) 


  5. Put the oink back on heat and when it begins to bubble, add the ground onion paste and give it a good stir and cook for 2 to 3 minutes on medium flame. 
  6. Add the Pandi Masala and stir well to ensure the masala is well mixed into the bubbling gravy. 


  7. Continue simmering for 3 to 4 minutes. 


  8. Add Kachampuli vinegar. Give the gravy a good stir and simmer for 2 more minutes. 


  9. Adjust seasoning and simmer for a minute more if adjusted. 
  10. Serve with pau or soft steamed rice. (I preferred it with soft steamed rice)


Pandi Masala

11 tablespoons coriander seeds
4½ tablespoons cumin seeds
5 Byadagi Chilies
16 dry red Guntur chilies
1½ teaspoons mustard seeds
3 tablespoons black peppercorns
½ inch cinnamon
2 cloves
A handful of curry leaves
6 grains of fenugreek seeds

Before Roasting

Method: 

  1. Roast each of the Pandi masala ingredients, SEPARATELY, until well roasted and quite dark in colour. Please roast each ingredient carefully, tossing them around all the time to ensure they do not burn. NOTE: Roast the curry leaves and chilies well, but not to a very dark shade. Just roast them well, until crisp.

    After Roasting 

  2. As each ingredient gets roasted, keep adding them into a large plate to cool down. 


  3. When the roasted ingredients are cool, dry grind them, together, into a powder. 


  4. This will give you approximately 120-125 grams of Pandi Masala. Cool and store in an air-tight bottle. 


Chef Notes: 
  1. Please note, Guntur chilies are spicy. Adjust the quantity of ground Pandi masala that you add to the gravy as per your tolerance. For us, this proportion was perfect! The final result was spicy and tangy without any of us having to use an ice pack the next morning. *evil grin* If you prefer a very spicy blend of curry, I suggest you increase the quantity of Guntur chilies. 
  2. Please do NOT use lean pork for this recipe. 
  3. The pork is cooked (in the cooker) on low heat, hence, please do NOT cut the pork smaller than 1½ inch chunks as chances are, the meat will disintegrate. Bigger chunks will be fine but do NOT cut the oink into tiny pieces. 
  4. When you empty out the pork from the cooker, please remember to use a non-reactive vessel like enamel, stainless steel, or non-stick, as you will be adding vinegar to the gravy. 
  5. You may take this recipe a wee bit further by sautéing the meat to a dry consistency, thereby turning the curry into a dry version of Coorg Pandi Fry. This can be served as a starter over crackers, as a filling for puff pastry or in vol-au-vent cases as party finger-food. 


    Coorg Pandi Fry (The Dry Version)

  6. If 1½ kilo pork is a bit much for you, halve the recipe. 
  7. I had sourced Kachampuli Vinegar (from Amazon) but if it is unavailable to you, you may substitute it with tamarind paste. The flavour will differ but the recipe will work with that, too. Also, adjust the tanginess to suit your preference. For me/us, 1½ tablespoons of Kachampuli was perfect. 


  8. I checked out many recipes on You Tube, and finally homed in on two that I liked. While I mainly stuck to the ingredients and method used in Sidhartha’s Kitchen, the Pandi masala is a combination of Sidhartha’s recipe and another recipe. For the life of me I cannot find the second recipe, nor do I remember the name of the channel. Apologies for that! 
  9. You may share the direct blog-link of the recipe/s but do NOT publish my recipes, and/or my photographs, on any blogsite or website without my explicit consent or attempt to pass off my recipe/s as your own. You will be held accountable for plagiarism.

    Some more photographs:


                                                                  Whole Spices Before Roasting

                                                                     Whole Spices After Roasting

Thursday, 12 November 2020

Sabudana Khichdee 2.0


After having cooked Chef Mandar Madav’s Kanda Poha (recipe on blog), I had been pestering him, for a foolproof Sabudana Khichdee recipe. For those of you who don’t know Mandar, he is Executive Chef at the Conrad Centennial, in Singapore. I’ve had the most amazing food when he was Executive Chef at Conrad-Pune. We lost him to Singapore.  Lucky buggers! ðŸ˜œ

Getting back to the recipe… Why 2.0, you wonder? That’s because I have already posted a workable recipe of Sabudana Khichdee. And though, this one is very similar to the first, for all the tiny (important) changes incorporated, I felt this one turned out better. Feel free to give both recipes a try and opt for the one that works best for you. 😊 I did make teeny-weeny changes, but this recipe is all Mandar, and it’s stellar. Follow it to a T and rest assured, you’ll have a khichdee with pearls of sabudana (sago) separate and ‘khila-khila’, just as they should be. 

Chef Mandar Madav, heartfelt thanks for allowing me to constantly trouble you for this recipe and for sharing it so generously and so perfectly.

Ingredients:

2 cups filled to the brim (or 300 grams) sabudana (sago) 
2 cups water, filled to the brim (for prep)
30 ml milk
1 cup peanuts
½ cup peanuts
20-25 curry leaves
3 medium sized potatoes, cut into 1 cm cubes
½ tablespoon cumin seeds
5 green chilies, cut into 1 cm pieces
4 tablespoons ghee
Salt, to taste
1 tablespoon sugar 
A handful coriander, chopped

Prep: 
  1. In a pan, roast 1 cup peanuts, ON LOW HEAT, until the peanuts turn a few shades darker and emit a beautiful nutty aroma. (Also, at this point the thin covering of the peanuts will loosen up.) This should, ideally, take 10 to 15 minutes. Do NOT rush this. 


  2. Remove the peanuts onto a plate. Rub the peanuts in the palm of your hands and discard the outer covering from all peanuts. ALLOW TO COOL.


  3. Once cool, grind the peanuts (please check video for ground peanut consistency) and keep aside, in an airtight box. 


  4. Approximately 10 to 11 hours BEFORE COOKING, gently wash the sabudana three or four times, until the water runs clear. (like you would for rice) 
  5. Lay out the washed sabudana in a large thali. (Most recipes tell you to use a bowl, TRUST ME, go with a deep stainless-steel thali). 


  6. Pour 2 cups water (480 mils) water filled to the brim to cover the sabudana. To ensure there are no mistakes or confusion about the sabudana-water proportion/ratio, I repeat, I used the cup measurement FILLED RIGHT TO THE BRIM for the sabadana and for the water. No confusion, right? 
  7. Add the milk, give it a gentle stir. 
  8. Cover and leave the sabudana aside for a minimum of 10 hours to a maximum of 11 hours. (I usually soaked the sabudana from 11.45 PM to 10.30 AM – room temperature – do NOT put it in the fridge) 

IMPORTANT: While you can prep the peanuts well in advance, you need to decide on what time you plan to cook the Khichdee, as the soaking time for the sabudana will mainly depend on that. That’s it; prep done!

Method:
  1. Take a LARGE colander and to that add the sabudana that have been soaking for 10 to 11 hours. The sabudana will have absorbed all the water and would have doubled in size by now.


  2. Heat ghee in a large non-stick pan/kadhai. 


  3. Add the half cup of peanuts, turn the flame to low and fry the peanuts until it emits a nice toasty aroma. When done, remove the peanuts from the ghee and keep aside. Please do NOT rush this, fry them on low heat. 


  4. Add the cumin seeds to the same ghee and allow to splutter.


  5. Add cubed potatoes, give them a stir, cover and cook until they are cooked to 90% doneness. 


  6. Open the lid, intermittently, and give them a stir, a couple of times, while they are cooking. 


  7. Add curry leaves, green chilies, salt and give it a stir. 


  8. Add the sabudana, the ground peanut powder and sugar. Give it a mix.


  9. Take the vessel off the stove, with a spatula, toss the sabudana mixture gently, but well, to ensure the sabudana and the ground peanut powder come together evenly. 


  10. Put the sago back on the stove, on HIGH FLAME
  11. Add the fried peanuts. and cook for a minute. Also, check seasoning at this point and adjust if needed. 
  12. Do not cook the sabudana for more than a minute on HIGH FLAME. Give it a few tosses, to ensure it heats evenly. (Please check Chef Note No. 8, and the video attached above, as regards to the correct way of tossing/stirring the sabudana) 
  13. Turn the stove off after that one minute of high heat cooking. 
  14. COVER the vessel for 4 minutes (at least) and allow it to accumulate steam from within. 
  15. Open the lid after the marked 4 minutes. Add chopped coriander leaves and give it a gentle stir/toss. Serve!


Chef Notes:
  1. The difference between the first Saudana Khichdee recipe posted by me and this one is really tiny and yet, those very tiny changes, as suggested by Chef Mandar, made a world of difference.
  2. Chef Mandar’s recipe called for 1 medium potato, the Bawi in me, used 3 medium potatoes. Chef Mandar’s recipe requires chilies to be cut into 1 cm pieces. I cut 3 chilies finely and 2 chilies into 1 cm pieces. At most times, I prefer to chop all 5 chilies finely (I prefer that). Whole fried peanuts are not a part of Chef Mandar’s recipe, but we love them. These are tiny changes are incorporated by me but the recipe is perfect and works beautifully. 
  3. Please ALLOW the roasted peanuts TO COOL before you grind them, or you may end up with a soggy, clumpy peanut mix. 
  4. The ground peanuts are essential as they tend to soak up the wee bit of extra moisture (if any) of the soaked sabudana. This will ensure the sabudana does not turn lumpy or clump up. 
  5. VERY IMPORTANT: At the end of the cook, leave the pan covered for 3 to 4 minutes as it allows the starchy sabudana to sort itself out. This is quite like how we leave cooked-steamed rice when we want each grain to be separate. The same method works here. 
  6. I used the Badadana Sabudana. Do NOT opt for tiny variety of sabudana pearls. 
  7. I used a spatula all throughout the cooking process as a curved spoon would most likely damage the delicate sabudana pearls. In case you don’t have a spatula, please use a FLAT wooden spoon (the one you would use with a non-stick pan). 
  8. The best way to mix sabudana while cooking is to go in from the sides of the pan and toss the sabudana into the centre of the pan. Do that from all sides of the pan to keep mixing and tossing the sabudana. This ensures they don’t get smashed. 
  9. This recipe and the finer points are mainly penned IN SUCH MINUTE DETAIL for people who are fed up with clumped-up sabudana. I humbly bow to experts who have been making sabudana for decades and can cook this recipe blindfolded. 
  10. There are many variations to this recipe. A few examples to this would be… The use of raw, cubed potatoes instead of boiled, adding a touch of turmeric powder and the use of finely grated coconut as garnish. The variations vary from region to region. 
  11. The cup I used is a regular measuring cup. For clarity… The maximum marking on the cup shows 200 mils but if you fill it right to the brim, the amount goes up to an exact 240 mils; the Universal measurement of one cup (Please, let’s not get into the US - UK measurement argument). I suggest you fill the cup for sabudana and water right up to the brim (as did I) to avoid any confusion. Theek hai? 😉 
  12. The photographs are a mix as regards to spoons, plates, etc., coz I have clicked pics every time I cooked this. I've lost count of the number of times I've recreated this in my kitchen. 
  13. As mentioned at the onset, the original recipe belongs Chef Mandar Madav. The photographs, though, belong to my blog, Kenzy’s Kitchen Korner. You may share the direct blog-link of the recipe/s but do NOT publish my recipes, and/or my photographs, on any blogsite or website without my explicit consent or attempt to pass off my recipe/s as your own. You will be held accountable for plagiarism.

    Some more photographs:


    I served hot Sabudana Khichdee to my family, but I had too much work in the kitchen hence I finally sat down with it 2 hours later. I could not help but shoot this video to show you the texture. Even after two hours, the sabudana pearls were fluffy, yet separate. :)