Pages

Friday, 21 August 2020

Murmura Ladoo (Mamra Na Ladoo)


I’d seen a post, of these ladoos, on a food forum at Facebook and I’d been yearning to make these. It brought back a memory of mum’s masi making these ladoos for her. Yes, mum loves Murmura Ladoos. While I did read the recipe posted at the food forum, I check out many recipes online and finally homed in on a You Tube recipe by Bharatz Kitchen. These babies turned out super!

Ingredients:

3 cups (57 grams – cup filled to the brim) murmura / puffed rice / mamra
1 cup (200 to 210 grams) jaggery
1 tablespoon clarified butter

Extras To Keep Ready:

A tiny bowl filled with room temperature water (for jaggery check)
A bowl of cool water to dip your hands
2 plates or thalis

Method:

1.    Roast the murmura on medium heat, stirring continuously, in a nonstick pan or a large wok. Do not allow the murmura to burn or catch colour.


2.    When all the murmura are hot to touch and well roasted (randomly pick up two-three murmura and break each into two, if you hear a ‘snap’, they’re well roasted)
3.    Remove the murmura onto a plate and keep aside.


4.    Put same the wok/pan back on low flame. Add clarified butter.


5.    When the clarified butter melts, add jaggery and allow it to melt. Keep stirring it continuously, preferable with a flat wooden spoon.
6.    When the jaggery has melted completely, cook it until it begins to turn one shade darker.
7.    Take a drop of jaggery and drop it into the tiny bowl of water.
8.    Fish out the jaggery from the bowl and if it has held its shape without disintegrating the consistency of jaggery is perfect.


9.    Shut off the stove and QUICKLY but CAREFULLY add the murmura to the molten jaggery.


10. Mix the murmura and jaggery in a way that the jaggery evenly coats the murmuras.
11. Transfer contents of the wok onto a plate.
12. Dip your hands in cool water, take a portion of the murmura-jaggery mixture and quickly roll it into a ball, place it onto the other plate. The size of the ladoo is entirely up to you.
13. Keep dipping your hands in water and continue making murmura-jaggery ladoos until all the mixture is used up.
14. This quantity gave me 18 ladoos, the size of large lemons.


Chef Notes:

1.    We wanted hard ladoos hence cooked the jaggery to one shade darker, after it had melted. If you prefer ladoos a tad softer and chewier, as soon as you realize the jaggery is molten and melted, add the murmuras and continue with the rest of the recipe as mentioned. For softer and chewier ladoos, do NOT allow the jaggery to go a shade darker. Also, for softer ladoos, you may omit the jaggery-drop water check.
2.    Yes, you may use powdered jaggery instead of regular jaggery cubes.
3.    Please keep both the bowls of water and the plates ready as you do NOT want to run around at the last minute.
4.    Once the mixture is taken off the stove it is scalding hot but solidifies very rapidly. That is precisely why from Point No 9 to 13 you need to work very quickly. You also need to be very careful as the mixture is hot and that is why we use the bowl of cool water to dip our hands. I’m told some people also coat their hands with ghee. How well that works, I really have no clue.
5.    Even after having dipped your hands in cool water, you will be going, “ouch ouch” at times, while handling the hot mixture. Come on, be brave, I could do it, so can you. *evil grin*
6.    Preferably, use a nonstick vessel if you are giving this a try for the first time. Also, post-cooking, it’s way easier to clean.
7.    There can be many variations and additions to this ladoo. Please note, I have made the absolute basic, no-frills recipe.
8.    There is an easy way out if you are scared of handling the hot mixture. Lightly grease a thali with clarified butter, pour in the hot murmura-jaggery mixture, press the mixture into the thali and spread it evenly. The spread should be, approximately, an inch thick. Quickly make square or diamond shaped cuts into the mixture with a knife as you would when making chikki. This will make it easier to break the murmura pieces after it solidifies. Voila! Instead of ladoos, you’ve made murmura chikki. Now that I’ve given you an easy way out, there’s no excuse for you not to make this, eh? 😉
9.    You may share the direct blog-link of the recipe/s but do NOT publish my recipes, and/or my photographs, on any blogsite or website without my explicit consent or attempt to pass off my recipe/s as your own. You will be held accountable for plagiarism.

Some more photographs:


Monday, 17 August 2020

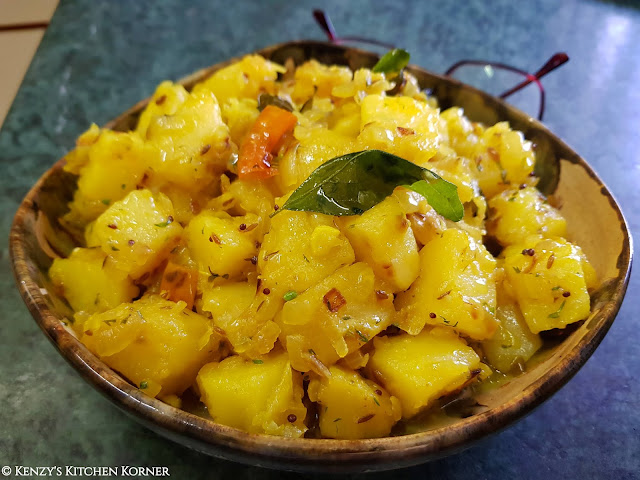
Potato Bhaji – Jeeru Rai Harrad No Papeto


Once again, I’m posting a basic recipe for newbies venturing into the kitchen arena. This is a simple, potato recipe that pairs brilliantly, as a side, with various lentils. It gets done in very little time and most important, if you’re anything like me and have a few potatoes boiled and ready in the fridge then… inko chil liya, toh life jingalala. 😉

Ingredients:

6 medium sized potatoes, boiled, peeled, and cut into cubes
3 medium onions, finely chopped
5 - 6 long green chillies, chopped fine
14 - 15 cloves garlic, thinly chopped
12 – 13 curry leaves
1 teaspoon cumin seeds
¾ teaspoon mustard seeds
1 – 1¼ teaspoon turmeric powder
Salt, to taste
A handful coriander leaves, chopped
4 – 5 tablespoons oil, or as needed

Method:

1.    Heat oil in a large non-stick pan/kadhai.


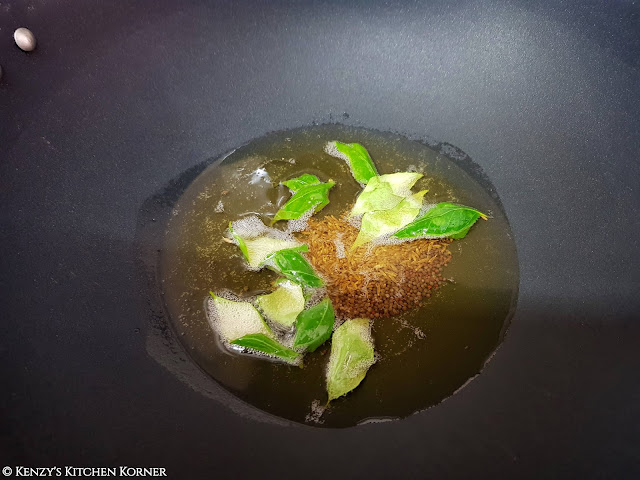
2.    Add cumin seeds, mustard seeds, curry leaves and allow to splutter.


3.    Add green chillies, garlic, and sauté for a minute or until a nice garlicky aroma becomes evident to your olfactory senses.


4.    Add onions and sauté until the onion go translucent pink and are just about to turn light brown.


5.    Add turmeric powder, salt, and sauté well to mix into the onions.


6.    Add the boiled potatoes and using a flat wooden spoon or a spatula, mix the potatoes gently but very carefully into the onion masala.


7.    Lower heat, cover and cook for 5 minutes to ensure the potatoes absorb the flavour of the onion masala.
8.    Open lid and check for seasoning and add if necessary.
9.    Cover once again and cook for a further 5 minutes.


10. Add coriander leaves, cook for a minute more and take the vessel off the heat. Serve!


Chef Notes:

1.    You can also make this recipe using raw, thinly sliced potatoes but if you are a newbie in the kitchen, and are unsure of cooking raw potatoes, I’d advise you to stick to using boiled ones.
2.    The sizes of the potato cubes is roughly ¾ inches. If you feel you can handle them carefully in a smaller size feel free to chop them accordingly.
3.    The green chillies and garlic can be adjusted to taste. Do use quite enough, though, as it is mainly these two ingredients that will lend heat to these potatoes.
4.    I chopped chillies two ways as mum and dad cannot handle spicy food. Some chillies were chopped large so that they could be set aside while eating.
5.    When tossing potatoes in the onion masala, the best technique is to use a flat wooden spoon or better still, a spatula and beginning from the sides of the pan toss the potatoes into the center of the pan. Continue doing this gently from all sides of the pan until the potatoes are well coated with the masala. This will ensure the potatoes don’t break into a mash.
6.    You may share the direct blog-link of the recipe/s but do NOT publish my recipes, and/or my photographs, on any blogsite or website without my explicit consent or attempt to pass off my recipe/s as your own. You will be held accountable for plagiarism.

Some more photographs:


Friday, 7 August 2020

Hosang Grandpa’s Masala Ni Khichree


There was a time, as a kid, when I believed my paternal grandfather, Hosang, to be a stern man. As I grew older, we went on to be great friends. I realized he was actually a damn cool hombre. We’d play carrom, rummy, and board games. There were times when we’d wear peak caps and watch cricket matches together. We’d place bets for 5 bucks (don’t you dare judge us 😝), and he’d watch me drool over Kapil Dev. He’d tease me, in Gujarati, by saying, ‘Tane su eh datro ne bobro gamech” (Translation: Why in the world do you like this guy with big teeth, who can barely speak right – he meant the line, “Palmolive ka jawab nahi”). Yes, such was my grandpa, and these are a few of the many wonderful memories I hold close to my heart, right to this day.

From the time when I was around 11 or 12, I remember grandpa cooking this Khichree for lunch. This was his once a week affair and I loved the khichree he cooked for us. When I began experimenting in the kitchen, at the age of 13, I learnt to cook this. Those were simple times and food cooked at home was basic but cooked with so much love. Gramps would merely add rice, masalas, and potatoes. Over the years I began adding a few extra ingredients and as of now, this is how I make it. This recipe is, of course,  dedicated to “Gramps”; forever, my partner in crime. ️ Oh yes, we'd gang up and were never up to any good. *evil grin*

Ingredients:

1¾ cups basmati rice
4 medium potatoes, cut into large 1 - 1½ inch cubes
2 large carrots, cut into large cubes
200 grams peas (I used a packet of frozen peas)
 2 onions, cut to a small dice
2 chilies, cut fine
4-5 tablespoons clarified butter
1 tablespoon ginger-garlic paste
1 heaped teaspoon cumin seeds
2 heaped teaspoons red chili powder (I use MDH Deghi Mirch Powder)
1 teaspoon Parsi Sambhar Masala (optional but would be great if you can procure it)
1 teaspoon turmeric powder
1 teaspoon coriander-cumin powder
½ teaspoon garam masala
2 chicken (or beef) stock cubes, crumbled
Salt to taste
3¾ - 4 cups water

Method:

1.    Heat ghee in a pressure cooker. Add cumin seeds and allow to splutter.
2.    Add onions and green chilies and sauté until the onions turn soft and pink and lose their sharpness.


3.    Add ginger-garlic paste and sauté it well.
4.    Add chili powder, turmeric powder, Parsi Sambhar Masala, coriander-cumin powder, garam masala, stock cubes and salt. Sauté well but carefully until masalas lose their rawness. Do not allow the spices to burn.


5.    Add the rice, potatoes, carrots, peas and give the ingredients a mix.
6.    Add 3¾ to 4 cups water and pressure cook for 2 whistles.
7.    After two whistles, lower heat, cook for 2 more minutes and then shut off the stove.
8.    Allow the cooker to cool down and release pressure by itself. Open the cooker when cool, empty the khichree into a serving bowl and serve with accompaniments like mango pickle, prawn pickle, chundo and papads. 😉


Chef Notes:

1.    Khichdee or khichree, they’re both the same. Most Parsi’s pronounce it as Khichree.
2.    Use any rice you are comfortable using. You don’t compulsorily have to use basmati. Usually, for other Khichree’s I use Indrayani rice, but I stick to Basmati when I cook this particular khichree.
3.    You can use clarified butter or oil or a combination of the two but, of course, ghee goes best with Khichree.
4.    If you are a vegetarian, do use vegetarian stock cubes. It does impart a lovely flavour to the rice.
5.    IMPORTANT: Stock cubes are always salty so please add salt with utmost caution or you’ll be left holding a salty Khichree. I truly cannot stress this point enough.
6.    If you don’t want the khichree too soft, I’d suggest you use 3¾ cups of water. If you prefer the khichree soft go ahead and add 4 cups. Also, do remember this is a Khichree, it’s not a pulao so the the rice need not be separate. Khichdee rice is always a tad soft.
7.    There are times when I add a cinnamon stick, a few black peppercorns, a cardamom and 3-4 cloves when I fry the onions. You could do that too.
8.    Add or subtract veggies as you please. This is one adjusting baby (read: Khichree). It will not judge you for going berserk on it. 😉
9.    Ensure you cut the veggies into large cubes as this khichree is pressure cooked. You don’t want the veggies turning to mush and that is precisely what’ll happen if you chop them small.
10. You may share the direct blog-link of the recipe/s but do NOT publish my recipes, and/or my photographs, on any blogsite or website without my explicit consent or attempt to pass off my recipe/s as your own. You will be held accountable for plagiarism.


Monday, 3 August 2020

Green Chutney – The Versatile Coconut-Cilantro-Mint Combination!


Yes, occasionally, I go back to posting basic recipes for people who are newbies in the kitchen. This is one such recipe. This green chutney works beautifully for sandwiches, for Parsi delicacies like Patra ni Machhi and Patra ni Kolmi and yes, you can also use it as a marinade-gravy base for meats. I usually make a 2-bottle batch and use it as and when I need it. It keeps beautifully in the fridge for a week to ten days and because of the added acidity, the colour remains a beautiful green. Go on, give it a try. 😊

Ingredients:

1 whole (medium-sized) fresh coconut, break, remove from shell and cut into slivers
1 cup (tightly filled) coriander leaves, washed
1 cup (tightly filled) mint leaves, washed
1 teaspoon cumin seeds
15 - 18 large cloves of garlic, peeled and washed (increase the quantity if the garlic cloves are small)
12 to 14 green chilies, break into 1-inch pieces
Juice of 2 to 3 limes, to taste
Salt, to taste
Sugar, to taste


Method:

1.    Combine coconut sliver, coriander leaves, mint leaves, green chilies, garlic cloves and cumin seeds, juice of 1 or 1½ limes (only), salt and sugar in a grinder. Add quarter cup water and give it a good whiz. Grind the chutney to a smooth thick consistency.


2.    Open the grinder to check the consistency of the chutney, add more water only if needed and give it yet another whiz.
3.    Check seasoning and acidity levels and adjust lime juice, salt, and sugar as/if needed. If added, give the chutney one more whiz to ensure the added ingredients are well incorporated into the chutney.
4.    Remove the chutney into clean, sterilized, airtight bottles or any airtight fridge container.


5.    Allow the chutney to cool to room temperature; do not put it in the fridge until cool.


Chef Notes:

1.    The quantity of lime juice, salt and sugar depends entirely on your palate. I do suggest you add these three ingredients a little at a time and keeping adding more, as needed. The thing to always remember when cooking anything is, you can always add more as needed, but once added, reducing the excess is difficult and, in some instances, impossible.
2.    I used 12 to 14 medium sized dark green chilies, the ones that are quite high on the heat quotient. If you choose to use the long, light green, not-so-spicy variety, please adjust the quantity according. Here too, the same rule applies. Add fewer chilies if you are unsure, taste as you grind, add more as/if needed and give the chutney a good whiz.
3.    When raw mangoes are in season feel free to substitute them in place of lime juice.
4.    There’s one more use for this versatile baby (read: chutney). Whisk in some smoothened yogurt to a bowlful of this chutney as serve it as a dip with tandoori chicken and tikkas. Oh yeah, it works!
5.    You may share the direct blog-link of the recipe/s but do NOT publish my recipes, and/or my photographs, on any blogsite or website without my explicit consent or attempt to pass off my recipe/s as your own. You will be held accountable for plagiarism.

Some more photographs: